Pages

Sunday, March 25, 2012

Saipan Good Eatin'

Image Detail
http://www.exploring-america.com/northern-mariana-islands.htm

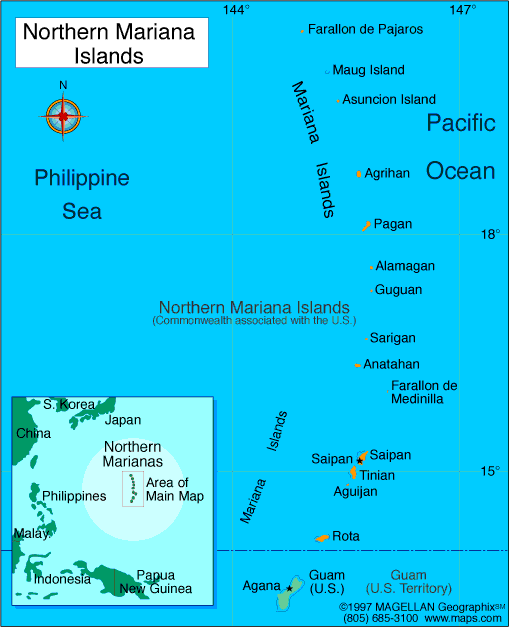
I lived on the island of Saipan in the Northern Marianas Islands.  I worked at a small international school teaching 4th grade.  I went there without knowing anyone. I even had a telephone interview, so I never actually MET anyone before arriving on my tiny island.   I figured I could do anything for a year and leave if I didn't like it. But I fell in love with the island and the people!  I so loved it there--sand, sun, fun. I loved the kids and I made lots of great friends.  Seven years(99-06), a husband, and a son later, I left kicking and screaming. 

Image Detail


Parties on the beach were abundant and so fun.  They always included barbecue, red rice, potato salad, and BEER.  Always lots of BEER!!!  The barbecue was usually some kind of meat (beef, pork, ribs, chicken and/or fish) that had been marinaded in usually a fina deni kind of sauce.  Always quite tastey. 

So, on this Spring Day, I decided to have me a Kansas City/Saipan barbecue for my family!  Here's the results:

Chamorro marinaded chicken, red rice, zucchini & yellow squash


Chamorro Marinade

2 cups soy sauce (I used less sodium variety)
1 cup sugar
2 tsp fresh chopped ginger
2 cloves garlic, chopped
1 medium onion, chopped
black pepper, to taste
crushed red pepper, to taste
2-3 pounds meat (pork, beef, chicken)


Heat soy sauce, sugar and ginger in a pan until sugar dissolves.  Do not let it boil over.  Simmer for a few minutes.  Remove from heat and add remaining ingredients.  Mix well.  Pour over meat in a seal able container (Tupperware, or ziploc bag).  Marinade for 2-3 hours or over night in the refrigerator, stir occasionally (once I ended up letting it marinade for two days...and it was DEVINE!).  Grill over charcoal.  Be careful not to let the marinade burn, because it does have sugar in it. 

Chamorro Red Rice


2 cups rice (NOT INSTANT!)
3 cups water (amount that it says on the package of rice)
2-3 strips of bacon (or two bratwurst chopped, spam also works, as does ham)
1/2 medium onion, chopped
1 clove garlic, chopped
2 packets of Sazon Goya Con Culantro Y Achiote (Coriander & Annatto)spice mix
(Look for it in the Mexican Food section of your grocery store.  It comes in a small box)  Or if you can find it 2 tablespoons of Achote spice (you can find it at an Asian food store.)

Fry bacon, remove from an to drain.  Add onions to the bacon drippings.  Saute until translucent.  Chop bacon.  Return to pan and mix with onions and add garlic.  Put water in rice cooker (or pan if you don't have a rice cooker).  Mix in spice packets.  Add onion/bacon mixture.  Add Rice.  Cook according to directions on the rice package. 

**If you are using other types of meat besides bacon.  Add it to the onions as you saute them.    You might need to add some oil to the onions then.  It depends on how oily the meat you are using is.

Zucchini & Squash

1 yellow squash, washed and cut into pieces
1 zucchini, washed and cut into pieces
(julienned them!)
1/2 medium onion, sliced and cut in half, or coarsely diced
1 packet of dry onion soup mix
2 T of olive oil
aluminium foil

Put vegetables in a large Ziploc bag or a large bowl.  Drizzle with the oil.  Sprinkle half of the soup mix on the veggies.  Seal the bag and shake.  Then add the remaining mix.  Shake again.  Tear off two good sized pieces of foil.  Put half of the veggie mixture on the foil.  Then fold the foil and roll the edges, so it is good and closed.  Put on the grill for about 20-30 minutes until tender.  Be sure to turn once or twice. 

** I put them on the grill about 5 minutes before cooking the chicken and then let them cook for about 5 more minutes after the chicken was done!


If you have any chicken leftovers, you can make an island favorite called Chicken Keleguen.

Chicken Keleguen

1 pound chicken, cooked and chopped (left over rotisserie works, baked, etc.)
Roasted red sweet pepper
The juice from one lemon
1 bunch green onions, finely chopped
1 cup unsweetened grated coconut (You can grate a whole coconut if you want!)
1 tsp chili paste
Salt and pepper to taste
Flour tortillas

Roast pepper.  Remove skin and seeds.  Dice.  Mix all ingredients.  Serve with warm tortillas.  It is good with Fina dene sauce.

Fina Dene

1/2 cup soy sauce
1/4 cup plain white vinegar
1 chopped onion
1 bunch chopped green onion
1 tsp chili pepper paste

Mix all ingredients.  Refrigerate for a day before using.  Then keep refrigerated.


I hope enjoy this yummy islandy barbecue dinner!

Saturday, March 17, 2012

Repurposed Spring Skirt and Shirt


A couple of years ago, my mom died.  She LOVED to wear comfy tshirts and  had lots of them, so I thought it would be good for my daughter to get a 'hug' from my mom with some re purposed clothes.  This is what I came up with:


It is made from a plus sized tshirt and a pair of plus sized knit pants.  To make the skirt, I used the bottom hemmed edges of the tshirt and the pants to make the bottom hemmed edge of the skirt, so I wouldn't have to make a hem--which I hate to make on knit!  I used the free pattern and tutorial for the pleated skirt at Fun Fleece.  The tutorial uses fleece, but I opted for the tshirt knit.


My absolute favorite blog is by Ashley at www.makeit-loveit.com.  She has some amazing things and used this blog to make the tshirt from the top part of the leftover tshirt.  It was made similar to the dress at Ashley's blog. 

I was going to applique a fish to the front of the shirt like this one, but then I realized there was a cuter star fish in the print of the shirt that was the coral color, so I went with that instead and sewed veins down each leg of the starfish in yellow, which is the way the print had it.  Then I put a dull yellow star in the middle of the start fish, to hide the starting points of the sewing.  It's quite cute!!!

My daughter loved the outfit because it is so twirly, AND it was made from her Grammie's clothes! 


Happy Re-purposing!

Sunday, March 11, 2012

St. Patrick's Day Ruffle Dress

It's that time of year when the Irish and Irish-for-a-day break out the green apparel.  So, I found this blog on Pinterest  here and made it my own.

Here's what I used:
1 white tshirt (I randomly found long sleeved Tshirts on Clearance for a buck!  Score!)
1/2 yard each of six different colors of St. Patrick's Day or green cotton print (prewash!)
(I pilfered my mom's fabric stash!)
2 yards 3/4 in wide green grosgrain ribbon
snaps
green jewel
a bit of felt
thread
sewing machine
pins


 Cut the sleeves off of the tshirt to make short sleeves (if you are using a tshirt that already has short sleeves!) Using a zigzag stitch, stitch at the hem line of each sleeve, stretching it slightly, as described here.  Then I cut a piece of elastic to go around my daugher's upper arm.  I pinned it in four to the inside of the arm hole about 1inch from the hem.  I then stretched the elastic as I sewed.  They gives the otherwise boring tshirt some extra flare!!!  (Sorry, I forgot to take a picture of this step!)
 Measure and draw guide lines starting about 2 inches below the armpit.  Draw the line on both the front and the back.  After the top line, leave 3 or 4 inches before drawing the next line, or evenly space 6 lines.  These will the be the guides for where you need to pin each ruffle. 
Using a quilting rotary cutter and board (it's easier and quicker, but scissors will work, too.  Just be careful to cut straight lines!), cut fabric in 5 inch by 45 inch pieces.  The length of each piece should be three times the length of the tshirt measured all the way around.  Take each piece separately and stitch wrong sides together at narrow ends to make long loops.  Press seam allowance open.  Then fold each piece under 1//4 inch and fold again.  Press to make hem.  Stitch hem in place.  Press again. 

Now it's time to gather.  Adjust stich length to the longest available.  Mine is 5.  Pin the green stip in even 1/4s.  Pin the middle front and middle back of tshirt.  Stitch straight across the unhemmed edge of the strip.  Pull the bobbin thread to gather.  Slide the strip over the tshirt.  Starting with your bottom guide mark on the tshirt, start pinning to the tshirt at the side seams and middle using the pins from earlier as guides.  Then adjust the gathers to make it fit the tshirt. Using a straight stitch, stitch the ruffle in place.  Stitch again using a zigzag stitch to finish the raw edge of the ruffle.  Remove ruffle basting stitch. Press.


Continue pinning, basting ruffle stich, pinning, and gathering for each color.  Use guide lines.  BE VERY careful not to let the other layers bunch up and sew too many layer.  Sew slow so you can keep checking.   Press after each ruffle layer.  Also be careful not to stretch the tshirt as you go.  Pin a lot to help with it not stretching.


 This is what happened when I did sew slow enough and keep checking.  The tshirt folded on the underside and stitched too many layer.  Then I had to growl and get out the seam ripper and try it again!  So sew carefully!!!  Unless you want to be close friends with that seam ripper!!!
Now measure the ribbon so it will go all around the top layer with about 1/2 inch overlap.  Run the edges of the ribbon through a burning candle wick.  This should melt and finish the edge, so it won't ravel during the laundry.  Pin the ribbon on carefully over the top of the raw edge of to the top ruffle.  Pin it A LOT to with not stretching the fabric.  Sew slow and be sure to check often that you are sewing on the layers that you want to sew on.  You don't want to rip anything else out!!! 
Then I made a Gerber Daisy Flower Embellishment for the front attaching it using a snap, so it could be removed before going in the wash.  It really needed something on the front!  I thought this made it adorable!

I made two little bows out of the ribbon and sewed them to the middle of the sleeve.  Make sure you run the raw edges of the ribbon through the fire of a candle to finish the edges. 

My daughter LOVES this dress because she can twirl in it!  I couldn't find any matching St. Patrick's Day tights.  But, I did find some extra cute adult sized knee high socks and made them into tights following this link.  It ended up being not quite long enough for a dress alone, so I have her wear shorts under it, too!  But she loves that!  And I love this....